Showing posts with label Houndstooth block tutorial. Show all posts

Thursday, November 22, 2007

An inch of rain has slowed the harvest so I have leisure to post while DH does the work today. DD had her treatment last night and is looking brighter this morning, desperate to get to a sleepover birthday tomorrow night-probably not the best plan but you can't keep them locked up for fear of the tummy pains returning.

I have been good this week, the gym 2 times!! (OK Susie P, pick yourself up off the floor now!!!)
I love that rowing machine, though 2x 10 minute sessions on it in 2 days mean that I do have some extra previously undetected muscles this morning!

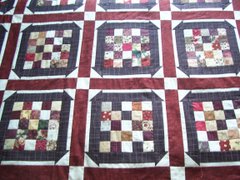
And look, distracted progress!!
The houndstooth check is at the hanging on the fence stage, I think a black border and we are go. It would mess with my head if it were much bigger, I don't think you could make the blocks much smaller either...it starts to play with your eyes..
Could probably call this photo, "Hounds amongst the chickens", "Check out the chooks".....open to another competition almost!
Thought you may like to see the result you can get with just the stripy blocks.
I like this as well, but even more points have to match than in my version....nasty, nasty matching points!!!

Have been designing my Christmas cards this week, better late than never! I think Carol's Canola layout will feature heavily, but I also wanted to include my new treasured Christmas decoration, so I took these pics of my Jim Shore nativity.

I could honestly look at that all day....any bloggers want to be on my Christmas card list! I might do some as postcards as well.

Thinking about this for notecards, I love the light in the pink.
Better be off and clean, have a great day, Tracey
Gratitudes:
1. DH here to do the work
2. Whoever invented DD's treatment machine
3. Jim Shore, who put 2 of my favourite things together..... patchwork and the Nativity!

Sunday, November 18, 2007

Houndstooth check blocks.....my way.

Little did Maddy know when she was photographed in her houndstooth jumper on November 4th that some one would be doing a tutorial on how to turn it into a quilt 2 weeks later! I would ring and tell her but think I lost her number when I updated my mobile phone...the price of technology!

I have emails and comments regarding this and rather than email 10 photos to everyone intersted, I will post my method. You don't have to like my method, my method is not necessarily good, just works for me and contrary to the many hypotheses presented to me, there is no foundation piecing, it is not done like a string quilt and there is not one bias edge...bias edges get me nervy!

So here we go.

This is a 6 inch base square of white. I then cut 2 x 3 inch squares for the corners. Can you see the green line on the black squares? That will be my sewing line.

Here is the exact same thing, except in reverse; a 6 inch black square, with 2x3 inch squares in opposite corners.

What's going on here?

Well, I have sewn along the green pencil line, (I would do a whole heap of these at once normally, chain piecing them together). Then I have turned it around and sewn another line of stitching to turn what would have been the wasted points to be cut off into little half sqaure triangles for another project straight away.

They are now gone.

And I am left with this after I iron it flat. See the green line there? Well, that's my humility line as I was too enthusiatic ruling that at the start as it needed to be on the back! Rule it on the back now people!

See, that wasn't so hard! Now place that square over it's opposite number, that one you just did on the black base, you know,

this one....just before I ironed the corners down.

Then sew 1/4 inch each side of the now blue pencil line...not on the line this time...that's something I would accidentally do when it was midnight!

See, 2 lines! Cut down the middle.

Which gives you this result.

Iron it, and you now have 2 blocks already, I told you it was quick and easy. Useful for so many colours and styles and I never worked with one bias. Trim and tidy as necessary to 5 1/2 inches.. You would need plain white and plain black squares as well to finish this quilt, as i started at 6 inches for this one, your plains would need to be 5 1/2 inches as well.

This is what I like,I am half way down the road with another quilt from leftovers, never waste your leftovers!

Off to watch CSI and see if Grissom is the one making those miniature house thingys! Can't miss the start!